Environment Setup
For this class you will need a C compiler (specifically gcc), git, make, and a text editor installed on the computer that you are using. This guide walks you through setting up your computer for the class.
On Friday we will get everyone setup to use git-keeper and write a simple program, so try to get things set up before class on Friday.
Installation
Here are instructions for installing the required programs on a number of different operating systems.
macOS
You may install any one of a number of text editors for this class. I will be using Atom for examples. If you don’t know which to pick, go with Atom. Some other popular editors for macOS are TextWrangler and Sublime Text.
On macOS, Git and GCC come with the Xcode command line tools package. This package must be installed separately from Xcode itself. To see if you already have it installed, open up the Terminal application. When you open up Teminal, you will be presented with a command prompt which looks something like this:
Computer-Name:~ Username$You can run commands at this prompt. Try running Git by typing the word git (all lowercase) and then pressing enter. If Git is already installed you will see a usage message. If not, a window will pop up asking if you want to install the Xcode command line tools. Install them now if this happens. You may get the following message:
Agreeing to the Xcode/iOS license requires admin privileges, please re-run as root via sudo.If so, run this command:
sudo xcodebuild -licenseYou will be prompted for a password, enter the password for your computer. You can scroll through the license by pressing the space bar, and press q to stop reading the license. You will then need to type agree and press enter. Once you have completed this, try running git again.
That is all you need to do to set up your Mac!
Windows
You may install any one of a number of text editors for this class. I will be using Atom for examples. If you don’t know which to pick, go with Atom. Some other popular editors for Windows are Notepad++ and Sublime Text.
If you are running Windows 10, follow the Windows Subsystem for Linux instructions. If you are running an older version of Windows, follow the Cygwin instructions. You need to set up the Windows Subsystem for Linux or Cygwin, but not both. Note that both of these methods may take some time for your computer to install.
Windows Subsystem for Linux (WSL)
Note: There is a new version of WSL called WSL2. It is not necessary for you to upgrade to WSL2.
Here is a YouTube video which walks through the WSL installation process, which is also documented at https://docs.microsoft.com/en-us/windows/wsl/install-win10. The first instruction asks you to open the PowerShell as Administrator. To do this, go to the taskbar search and type in powershell. The top result should be “Windows PowerShell”. Right click on this item and select “Run as administrator”.
Any of the available Linux distributions should work for this class, but these instructions assume you select Ubuntu. Selecting either of the other distributions will make the other commands in this guide different, so I recommend using Ubuntu.
Now you need to install some more programs in the Ubuntu environment. One of the nice things about Linux is that you can install and upgrade programs in one place (on the command line). Make sure all the installed programs are up to date by running the following two commands. The sudo in front of these commands means they will be run as the administrative user. You may be prompted for your Linux account password when you run a command using sudo.
sudo apt updateand then
sudo apt upgradeOnce everything is updated, run the following command to install the necessary programs for the class:
sudo apt install build-essential gitIf no errors are reported, you should now be set up to compile and run C programs in your Linux environment.
Cygwin
Only install Cygwin if you were not able to install the Windows Subsystem for Linux.
If you have a 64-bit computer (you probably do) be sure to download setup-x86_64.exe.
Run the setup-x86_64.exe program that you downloaded. Step through the installation process. The defaults should be fine until you get to the mirror selection screen. I had good luck picking http://mirrors.xmission.com. Once the Cygwin core has been downloaded you will be presented with the Select Packages screen which looks like this:
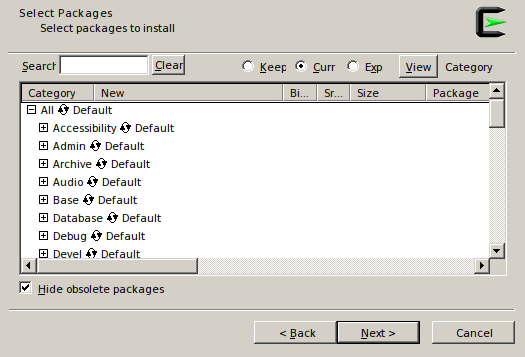
There are 3 packages under the Devel section that you should install: gcc-core, git, and make. Expand the Devel section and scroll down to find each of these packages. Click on Skip and it will mark the package for installation:
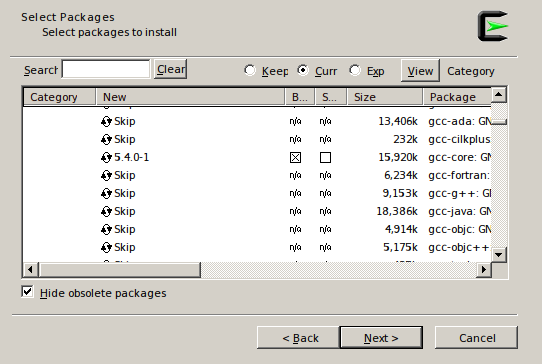
From the Doc section you should mark the package man-pages-posix for installation.
Once those 4 packages have been marked for installation, click Next, and then Next again, keeping “Select required packages (RECOMMENDED)” checked.
Once all the packages have been installed, have Cygwin create a desktop shortcut and/or an entry in the start menu.
Now run Cygwin and you should be presented with a command prompt that looks something like this:
User@ComputerName-d3a3c25ad0 ~
$
Type the word git and press enter. If you see a usage message rather than an error, Git was installed correctly.